One click, whole workflow
Recipes are here. Package a whole workflow and run it in one click
Explore recipesOne click, whole workflow
Recipes are here. Package a whole workflow and run it in one click
Explore recipesA practical GPT Image prompt guide built on OpenAI's own documentation and our own test runs: prompt structure, exact typography, edits that keep what you want, quality settings and output sizes.
All guides · GPT Image in Fuser
Quick answer: write a GPT Image prompt as short labelled sections: what the image is for, the scene, the subject, any exact text, the style, then constraints. Put every word that must appear in quotes and say where it goes and how it should look. For edits, say "change only" the thing you want and list what must stay. That is the pattern OpenAI documents for its current image models (OpenAI image prompting guide), and it is the pattern behind every test image on this page. In Fuser the GPT Image node defaults to GPT Image 2.5 Flare; switch to Sunburst when a result needs more quality than speed.
The GPT Image node in Fuser calls OpenAI directly and lets you choose the model. Three are current:
GPT Image 2.5 Flare (default). OpenAI describes it as "fast, high-quality everyday image generation" (model page) and its prompting guide says to choose Flare when speed is the priority.
GPT Image 2.5 Sunburst. OpenAI calls it "our most capable model for image generation and editing", with a particular strength in editing precision (model page); the prompting guide suggests starting with Sunburst when GPT Image 2 falls short of your quality bar.
GPT Image 2. The previous generation. OpenAI's cookbook recommends it for text-in-image work and editing-heavy flows (OpenAI cookbook), and says Flare offers quality comparable to it at lower latency (prompting guide).
GPT Image 1.5, 1 and 1 Mini are still in the dropdown for older workflows, but they cannot use the 2K and 4K sizes or the xhigh and max quality settings.
OpenAI's advice is to name the subject and intended use first, then composition and placement, and for complex requests to organise the prompt as scene, subject, details and constraints (prompting guide). A line break per section is enough. Here is the prompt we used for the test below:
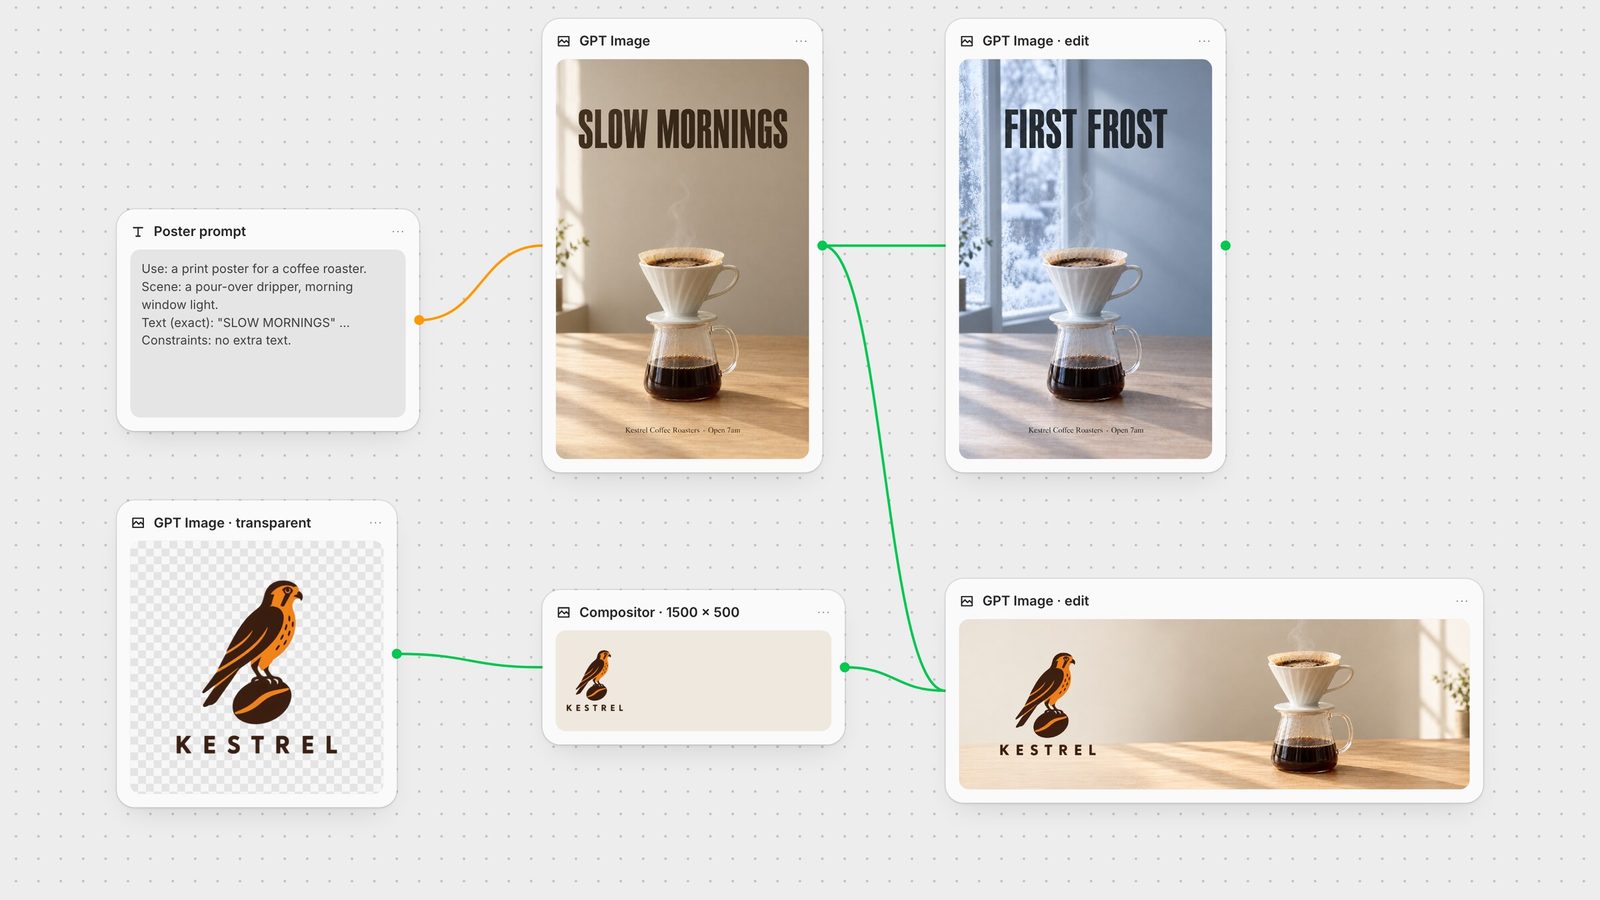
Use: a print poster for a neighbourhood coffee roaster.
Scene: a single white ceramic pour-over dripper on a pale oak counter, soft morning window light from the left, a thin curl of steam.
Text (exact, verbatim, each line appears once): headline "SLOW MORNINGS" in a bold condensed sans-serif across the top third; below the dripper, smaller "Kestrel Coffee Roasters · Open 7am" in a light serif.
Style: photorealistic product photography, muted warm palette, generous negative space above the dripper.
Constraints: no extra text, no logos, no watermark.
All three versions spelled both text lines correctly and put them where we asked. The differences were in how literally they read the scene: Flare added a glass carafe under the dripper that the prompt never mentioned, while Sunburst and GPT Image 2 kept the dripper on its own. If a detail matters, state it as a constraint ("the dripper stands alone on the counter") rather than trusting the model to infer it.
A few description habits from OpenAI's guidance that are worth keeping:
Name materials, lighting, colours and the medium. Say "photorealistic" or "real photograph" when that is the goal.
Treat camera terms such as "50mm lens" or "shallow depth of field" as cues for the look, not guarantees.
For people, describe framing, gaze and what their hands are doing: "full body visible, feet included", "looking down at the open book".
OpenAI's documentation gives the same handful of rules for text inside images:
Quote the exact text. OpenAI's cookbook suggests quotes or ALL CAPS for literal text, and asking for it "EXACT, verbatim" when the wording must not change (OpenAI cookbook).
Describe the type as a constraint. Font style, weight, size, colour and position: "bold condensed sans-serif across the top third".
Spell hard words letter by letter. For brand names and unusual spellings, add the spelling: "Kestrel (K-E-S-T-R-E-L)".
Ask for the text once and nothing else. "Render the tagline exactly once" and "no extra text" stop stray captions and invented labels.
Raise quality for small or dense text. OpenAI recommends medium or high for small text, dense layouts and multiple fonts. OpenAI also notes that the models "can still struggle with precise text placement and clarity" (image generation guide), so check every output before it ships.
In our chalkboard test, both quality levels spelled all seven lines correctly. Quality high lined the prices up in a clean right-hand column and gave the chalk more texture; quality low placed each price loosely after its item. OpenAI's own advice fits what we saw: find the setting that meets the requirement, then test lower settings to see if they still pass, and use xhigh or max only when they fix something high cannot (prompting guide).
Connect an image to the node's Images input and GPT Image edits it instead of starting from scratch. OpenAI's editing pattern has three parts (prompting guide):
Scope the change. Start with "change only" and name the thing to change.
List what must stay. Identity, geometry, layout, lighting, labels, camera angle: whatever matters for this image.
Exclude what you don't want. "No extra text, no logos, no watermark."
Our edit prompt was: "Change only the season and the headline. Make it a cold winter morning: frost on the window glass, a light blue-grey cast to the daylight, snow visible outside. Replace the headline with "FIRST FROST" in the same bold condensed sans-serif, same size and position. Keep the dripper, carafe, counter, camera angle, framing and the bottom line exactly as they are." The result kept the product, layout and small print and changed only what we named.
For a chain of edits, feed each output into the next edit, ask for one change at a time, and repeat the list of things to keep every time. OpenAI recommends exactly this to reduce drift. In Fuser that is a row of GPT Image nodes wired output to input, so every step stays on the canvas and you can branch from any of them.
Multiple reference images. When you connect several images, give each one a number and a job: "Image 1 is the layout. Image 2 is the scene reference." Then say how they combine and what moves where (prompting guide). Our banner edit used a 1500 × 500 layout with the logo already placed as Image 1 and the poster as Image 2. It kept the logo on the left, where the layout put it (slightly larger), and pulled the dripper, carafe and light from the poster.
Masks. The node also takes a Mask image to mark the area to edit. The mask must match the image's size and format and include an alpha channel, and OpenAI describes mask edits as prompt-guided rather than pixel-exact (image generation guide), so still describe the change in the prompt.
Size. The Aspect Ratio control offers 1024 × 1024, 1536 × 1024, 1024 × 1536, 2560 × 1440, 3840 × 2160 and auto. The two large sizes work on GPT Image 2 and 2.5 only. OpenAI calls anything above 2560 × 1440 experimental (image generation guide), so treat 4K as a test setting.
Exact pixel sizes. GPT Image does not take arbitrary sizes in Fuser. For a fixed format such as a 1500 × 500 X header, build the layout at that size in the Compositor, connect it to GPT Image as an input with the size set to auto, then place the result back in the Compositor to export at exact pixels. Auto keeps the shape but rounds to what the model supports: our 1500 × 500 layout came back at 1488 × 496.
Quality. Low, medium, high and auto on every version; xhigh and max on GPT Image 2.5 Flare and Sunburst only. Fuser defaults to auto.
Transparent background. Turn on Transparent for logos, stickers and product cut-outs. It applies to text-to-image only, not when images are connected. Say it in the prompt too: OpenAI's logo example asks for a "fully transparent background" with "no solid backdrop, scenery, checkerboard" (OpenAI cookbook). The Kestrel logo in the canvas above came out of our run with a real alpha channel. For an existing photo, a dedicated background remover is the more direct route; see the best AI background removers.
Poster with exact type: "Use: a gig poster. Scene: a neon-lit alley at night, wet cobblestones. Text (exact, once): "NIGHT SHIFT" in a tall condensed sans across the top; "Friday 14 Nov · The Vault" small at the bottom. Style: photorealistic, teal and magenta. Constraints: no other text, no watermark."
Logo on transparency (Transparent on): "An original logo for a bakery called Field & Flour. Clean vector-like shapes, strong silhouette, flat colour, no gradients. A single centred logo with generous padding on a fully transparent background; no backdrop, checkerboard or shadow."
Product photo: "Use: an ecommerce hero image. Subject: a matte green glass perfume bottle on a travertine block. Soft diffused studio light from the right, gentle reflection, pale sand background. Photorealistic. Constraints: label text unreadable, no extra props, no watermark."
Infographic: "A clean one-page infographic titled "How a Pour-Over Works" with four numbered steps: rinse the filter, add ground coffee, bloom for 30 seconds, pour in slow circles. Simple line icons, white background, readable sans-serif labels, no tiny text."
UI mockup: "A realistic mobile app screen for a neighbourhood library: a header, a search bar, three book cards with covers and due dates. White background, one accent colour, clear typography. Shown in a phone frame."
Change-only edit (image connected): "Change only the jacket to a navy wool overcoat. Keep her face, hair, pose, background, lighting and framing exactly the same. No text, no logos."
Two-image composite (two images connected): "Image 1 is the room. Image 2 is the armchair. Place the armchair from Image 2 by the window in Image 1, matching the room's light and shadows. Do not change anything else."
Sketch to render (sketch connected): "Turn this drawing into a photorealistic image. Preserve the exact layout, proportions and perspective. Choose realistic materials and lighting. Do not add new elements or text."
Prompts 6 to 8 follow the editing patterns in OpenAI's cookbook, which covers try-on, compositing and sketch-to-render in more depth (OpenAI cookbook).
Misspelled or extra text: quote the text, add "exact, verbatim, appears once", spell brand names letter by letter, add "no other text", and raise quality to medium or high.
Unwanted objects: name them in the constraints or state the positive version: "the dripper stands alone on the counter".
Edits drift from the original: shorten the change to one thing and restate the full keep list. Start the next edit from the best previous output, not the first.
Wrong input used for the wrong job: number your references and give each one a role in the first line of the prompt.
Transparent toggle has no effect: it only works without connected images. Generate the asset from text, or cut out an existing image with a background remover.
Slow generations: OpenAI notes complex prompts can take up to two minutes (image generation guide). Try Flare, a lower quality level or a standard size before cutting the prompt.
GPT Image is most useful as one step in a larger graph. Keep your house prompt in a text node and reuse it across variations, feed GPT Image stills into an image-to-video model such as Kling 3.0 or the other image-to-video models, and finish exact-size assets in the Compositor. To see how GPT Image compares with other image models on the same prompt, read Nano Banana vs GPT Image and the best AI models for text in images.
What to write, and the setting that goes with it.
| Goal | Write in the prompt | Set in Fuser |
|---|---|---|
| Generate | ||
| Clear structure | Use, scene, subject, text, style, constraints on separate lines. | Model: GPT Image 2.5 Flare (default) |
| Exact text | Quote it, say "exact, verbatim, appears once", describe font and position. | Quality: medium or high |
| Unusual names | Spell them letter by letter: Kestrel (K-E-S-T-R-E-L). | Quality: medium or high |
| Logo or sticker | "Fully transparent background, no backdrop, checkerboard or shadow." | Transparent: on, no images connected |
| Large output | Keep composition simple; check fine detail. | Aspect Ratio: 2560 × 1440 (3840 × 2160 is experimental) |
| Edit | ||
| Small change | "Change only X. Keep A, B and C exactly as they are." | Connect the image to Images |
| Several references | "Image 1 is … Image 2 is …" then how they combine. | Connect images in order |
| Exact pixel size | "Keep the format of Image 1." | Build layout in Compositor, size auto, export from Compositor |
| Hard cases | Restate the keep list on every pass. | Model: GPT Image 2.5 Sunburst |
Write short labelled sections: the intended use, the scene, the subject and key details, any exact text, the style, then constraints such as "no extra text, no watermark". OpenAI recommends this scene, subject, details and constraints order for complex requests.
Put the exact words in quotes, add "exact, verbatim, appears once", describe the font and position, spell unusual names letter by letter and use medium or high quality for small text. In our tests all three current versions spelled short poster text and a seven-line menu correctly, but always check the output.
Flare is OpenAI's fast everyday model and the default in Fuser. Sunburst is aimed at quality and editing precision. OpenAI suggests Flare when speed matters and Sunburst when the quality bar is demanding.
Yes, for text-to-image. In Fuser, turn on Transparent on the GPT Image node with no images connected, and also ask for a fully transparent background in the prompt. It does not apply to edits of connected images.
1024 × 1024, 1536 × 1024, 1024 × 1536 and auto on every version, plus 2560 × 1440 and 3840 × 2160 on GPT Image 2 and 2.5. For another exact size, make the layout in the Compositor, pass it to GPT Image with size auto and export the final file from the Compositor.
Connect the image, start the prompt with "change only" and name the change, then list what must stay the same. For a marked area, add a mask with an alpha channel at the same size as the image; OpenAI notes mask edits are prompt-guided, so describe the change as well.
Generate, edit and size images in one graph, then send them on to video.