One click, whole workflow
Recipes are here. Package a whole workflow and run it in one click
Explore recipesOne click, whole workflow
Recipes are here. Package a whole workflow and run it in one click
Explore recipesA working guide to Luma Ray 3.2: what each mode does, how to prompt it, when to use an end frame or a loop, and what our own test clips showed.
All guides · Luma Ray in Fuser
Quick answer: Luma Ray 3.2 does four jobs: text-to-video, image-to-video, video edit and reframe (Luma). For most work, start from an image. Write the prompt about motion and camera, not about what the frame already shows. If the shot has to finish on an exact framing, add an end frame; our push-in landed on it. Turn on Loop for ambient clips, and use Reframe to turn a 16:9 clip into 9:16 without re-generating it, but check tight shots: ours came back recomposed. In video edit mode, Luma's advice is to describe the finished look and leave out words like "change", "gradually" or "no".
Ray3.2 is Luma's current video model, released on 9 June 2026 (Luma announcement). Luma pitches it on control rather than raw generation: keyframes across the clip, reframing after the take, and native HDR with 16-bit EXR export for grading. Text-to-video and image-to-video clips are 5 or 10 seconds and come without sound. Reframe and Modify Video keep the source clip's audio (Luma Ray).
In Fuser, all of this sits in one Luma Ray node with a Mode switch:
Generate: a prompt, plus an optional start Image and End Image. With no image it runs text-to-video; with one, image-to-video.
Reframe: a source Video and a new aspect ratio.
Video Edit: a source Video, an optional Start Image and an Edit Mode that sets how far the result may drift from the source.
Ray 3.2 is the node's default model. The node also lists two older Ray versions; this guide covers 3.2 only.
We took one start frame, a terracotta vase on a travertine plinth from our Veo, Kling and Seedance comparison, and ran four Ray 3.2 jobs on it. We first drafted all four at 540p, the node's default, then re-ran them once each at 720p, the resolution Luma's Ray 3.2 guide suggests for polished review (Luma: Ray 3.2 Video to Video). The clips on this page are the 720p runs. The 540p drafts behaved the same way on every point below; the second pass was for picture quality, not a retry of a failed result. We ran them with the same Ray 3.2 image-to-video model the Fuser node calls (Luma: Ray 3.2 generation guide).
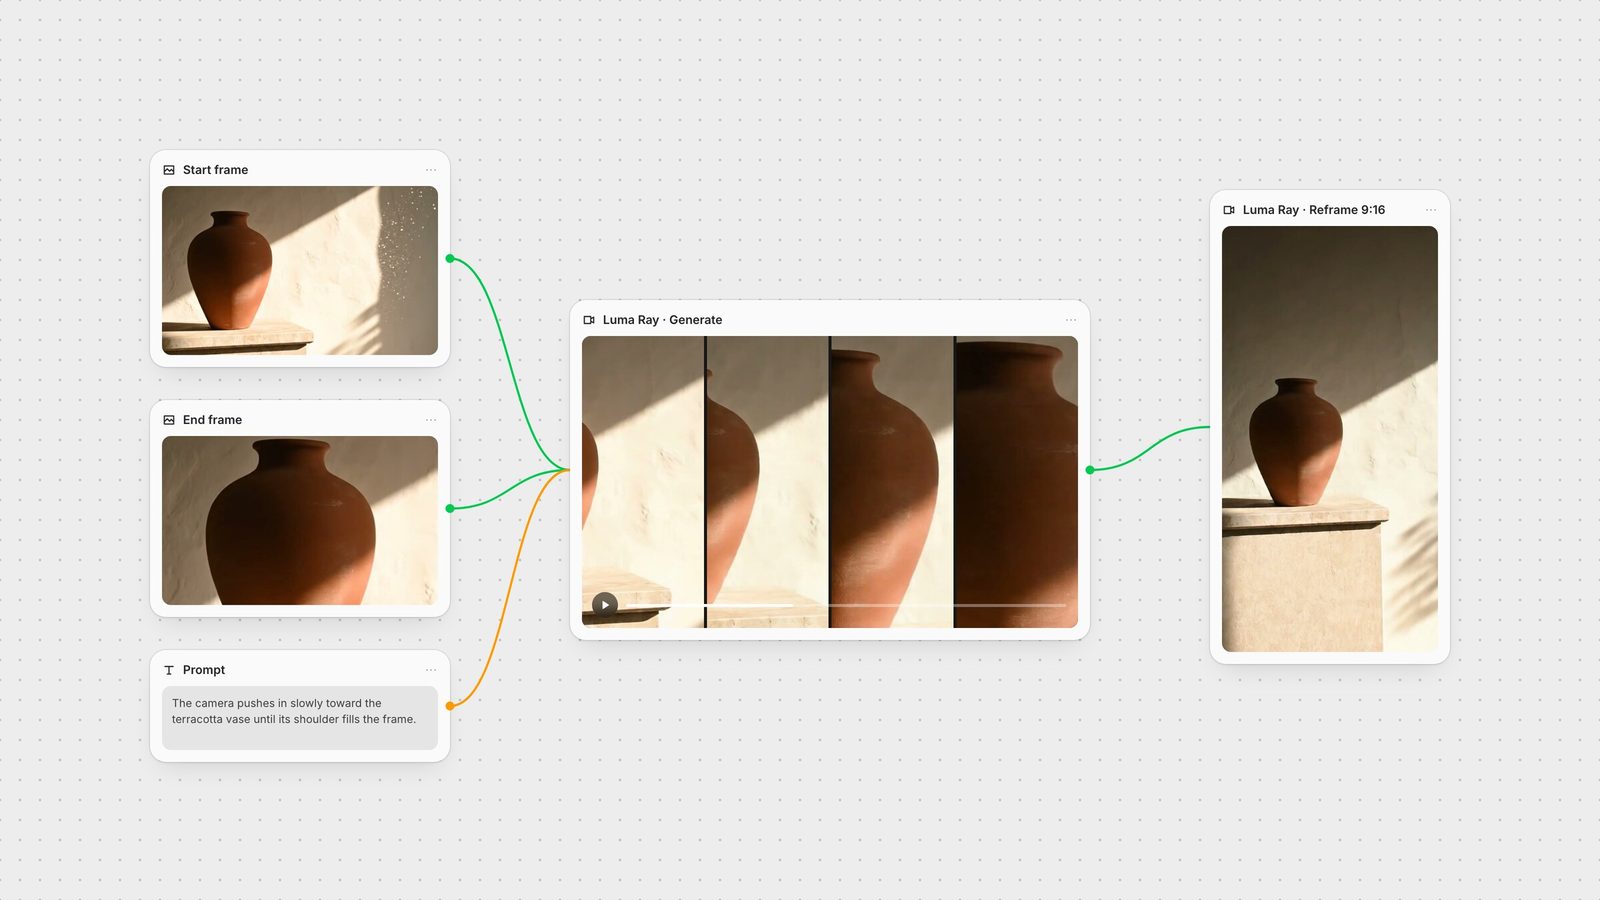
Start and end frame. For the end frame we cropped the start frame to a close-up of the vase's shoulder. The prompt was: "The camera pushes in slowly toward the terracotta vase until its shoulder fills the frame. Warm late-afternoon light, dust drifting in the sunbeam, one continuous move." Ray produced a smooth push-in, and its last frame is almost identical to the end frame we supplied. The camera move was the one we drew, not one the model guessed.
Start frame only. The prompt asked for a "slow orbit to the right around the terracotta vase, keeping it centred". Ray gave us a gentle move to the right that brought the vase to the centre. It was closer to a slight arc than an orbit, and the dust sparkle from the start frame thinned out over the second half of the clip. A start frame and a prompt give you believable motion, but only an end frame tells Ray where to land.
Loop. With the same start frame and Loop on, we asked for a "locked-off static camera" with dust drifting through the beam. The clip came back 8.75 seconds long, not 5. The camera drifted right and came back, and the last frame matched the first closely enough to repeat without a visible jump. The loop won over the "static camera" instruction.
Reframe to 9:16. We fed the push-in clip into Reframe with the prompt "Extend the scene into a vertical frame: more of the sunlit plaster wall above the vase and the full travertine plinth below it, matching the warm late-afternoon light." The length and timing held (5 seconds in, 5 seconds out), and the new wall, plinth and shadows matched the light. The framing did not hold. The source ends on a tight close-up of the vase's shoulder; the vertical version keeps the whole vase and plinth in view and turns the push-in into a gentle drift forward. Our 540p draft of the same job did the same thing, so treat it as how Reframe behaves with a tight shot and a prompt that asks for the whole object, not as a fluke. None of the outputs had an audio track.
Describe what changes, not what is there. The start frame already sets the subject, light and style. Spend the words on motion: what moves, how fast, and the camera move.
Name one camera move. "Slow push-in", "gentle arc to the right" or "static camera". Our orbit request came back as a mild arc, so expect Ray to interpret a move softly unless you pin the ending.
Pin the ending with an end frame. When framing matters, such as a product close-up, a logo lockup or a match cut to the next shot, supply the last frame. In Fuser the End Image needs a start Image. For more on this technique across models, see first and last frame video.
Keep the prompt consistent with the frame. If the image is warm late-afternoon light, don't ask for night. Ray keeps the start frame's look.
With no image, the prompt carries everything: subject, setting, light, camera and mood, written as one shot. Text-to-video is the only Generate route that offers 10 seconds in Fuser. If you need a particular look, it is usually quicker to make the first frame with an image model such as Luma Uni-1 or GPT Image and animate that.
Use Loop for ambient motion that will repeat: dust in a beam, water, smoke, a slow drift across a product. It works only on 5-second standard-range generations without an end frame, so Fuser turns it off if you add an End Image or choose HDR (Luma: Ray 3.2 generation guide). Expect some camera movement even if you ask for none, and check the clip length before you place it in an edit.
Luma's own guide to Ray 3.2 video-to-video is the best reference for this mode (Luma: Ray 3.2 Video to Video):
Describe the end state, the look the finished frames should have, rather than a process. Luma's example: "A sports car made of brushed black titanium, with subtle satin reflections and crisp panel lines. Preserve all other elements including subject identity and pose."
Avoid imperatives ("change", "make", "turn"), time words ("gradually", "over time") and negation ("no", "without").
End with a preservation cue for what must stay the same.
To steer the look precisely, restyle the source's first frame with an image model and attach it as the Start Image. Luma's guide describes the same pattern with image models such as Uni-1, Nano Banana or GPT Image.
Edit Mode in Fuser maps to Luma's edit strength: Adhere 1 to 3 stays closest to the source, Flex 1 to 3 is balanced, and Reimagine 1 to 3 moves furthest away. Auto Controls lets the model decide what to hold from the source (Luma: Ray 3.2 video editing). Leave it on Default first, then move toward Adhere if the subject drifts or Reimagine if the change is too timid. Luma's guide suggests 360p or 540p for exploration, 720p for polished review and 1080p for final delivery; the lowest option in Fuser is 540p.
One naming note: Luma's own guide now describes separate Structure, Motion and body, pose and face controls in place of Adhere, Flex and Reimagine, and maps the old modes onto them (Structure replaces the old adherence scale). Luma's API, and so the Fuser node, still takes the Adhere, Flex and Reimagine levels.
Tell Ray what belongs in the new space: more sky, the rest of the table, the floor under a plinth. Luma's example prompt is "Extend the scene into cinematic widescreen" (Luma: Ray 3.2 reframing). Reframe keeps the source's timing, so it is the cheap way to get a vertical cut of a clip you already approved. Luma describes it as preserving the footage frame for frame; in our test it recomposed a tight close-up instead. If the move itself matters, reframe a clip whose subject already sits comfortably inside the new frame, keep the prompt about the empty space rather than about showing more of the subject, and check the last frame before you publish.
Aspect ratio: 16:9, 9:16, 4:3, 3:4, 21:9 or 1:1.
Resolution: 540p (default), 720p or 1080p.
Duration: 5 or 10 seconds. Image-to-video, including start and end frames, is 5 seconds.
Render Format: Standard, HDR, or HDR + EXR. HDR is for image-to-video and video edit, needs 720p or 1080p, and cannot be combined with Loop.
Loop: on or off, 5 seconds only, not with an End Image.
The node's settings panel enforces these rules as you change them, so an invalid combination switches back before you run. Luma's announcement talks about placing up to 16 keyframes in one clip, and Luma's API accepts a list of keyframe images pinned to frame positions (Luma: Ray 3.2 generation guide). The Fuser node exposes a start and an end frame.
Cost (Fuser bills in its own credits): a 5-second image-to-video clip costs twice as much at 720p as at 540p, and 1080p costs four times as much as 720p. Reframe is billed per source second, and 1080p reframe costs three times as much as 720p (Luma: Ray 3.2 pricing). The jump to 1080p is steep, which is why the draft-low, finish-high routine matters with Ray.
Ray 3.2's outputs have no sound, and each clip is short, so it works best as one step in a chain. In Fuser, a typical graph looks like this: make the keyframes with an image model, feed them to the Luma Ray node as Image and End Image, then connect the clip to MMAudio or Mirelo SFX for sound and to a second Luma Ray node in Reframe mode for the vertical cut. Draft at 540p or 720p, then re-run the keeper at 1080p or upscale it with Topaz. To see how Ray compares with other image-to-video models, read best image-to-video models. For other ways to restyle footage, see best AI video editing models.
What each mode takes in Fuser and the limits that matter.
| Mode | Inputs | Limits and tips |
|---|---|---|
| Ray 3.2 in Fuser | ||
| Text-to-video | Prompt | 5 or 10 s; standard range only; describe the whole shot. |
| Image-to-video | Prompt + start Image | 5 s; HDR available at 720p+; prompt the motion, not the frame. |
| Start + end frame | Prompt + Image + End Image | 5 s; no Loop; use it when the ending framing must be exact. |
| Loop | Prompt, optional Image, Loop on | 5 s standard range, no End Image; our clip returned at 8.75 s. |
| Reframe | Prompt + Video + aspect ratio | Keeps the source timing; may recompose tight shots; describe what fills the new area. |
| Video Edit | Prompt + Video, optional Start Image | 5 or 10 s; Adhere, Flex or Reimagine; describe the end state. |
Ray3.2, released by Luma on 9 June 2026. It covers text-to-video, image-to-video, video edit and reframe, and is the default model in Fuser's Luma Ray node.
Yes. Add a start Image and an End Image in Generate mode and Ray animates between them. In our test the last frame of the clip closely matched the end frame we supplied. In Fuser the end frame needs a start frame, and the clip is 5 seconds.
Turn on Loop in Generate mode. It works on 5-second, standard-range clips without an end frame. Prompt for ambient motion, and expect some camera drift; our looped clip came back 8.75 seconds long with first and last frames that matched.
No. Luma says text-to-video and image-to-video clips have no natively generated audio, and none of our test clips had an audio track. In Fuser you can add sound by connecting the clip to a video-to-audio node such as MMAudio or Mirelo SFX.
5 or 10 seconds. Ten seconds is available for text-to-video and video edit; image-to-video, start-and-end-frame and looped clips are 5 seconds.
They set how closely the edit follows the source video. Adhere stays closest, Flex is balanced, and Reimagine moves furthest away, each with three levels. Auto Controls lets the model decide.
Make the frames, animate between them, reframe and add sound on one canvas.