One click, whole workflow
Recipes are here. Package a whole workflow and run it in one click
Explore recipesOne click, whole workflow
Recipes are here. Package a whole workflow and run it in one click
Explore recipesA step-by-step workflow for turning a single packshot into a short video ad: stage the product, animate the scene, add sound, voiceover and captions, then finish packaging and end card on exact layers.
All guides · Chain AI models into one workflow
Quick answer: start from a clean packshot, stage the product in a lifestyle scene with a reference-led image model, animate that still with an image-to-video model such as Seedance 2, Kling 3.0 or Veo, add sound and captions, then put the real packaging and end card on top in the Compositor. Keep every step connected so a new product or a new market only means swapping the input.
A product video ad has two jobs that pull against each other: it needs motion and atmosphere, and it needs the product to look exactly like the thing on the shelf. The workflow below lets AI handle the first and keeps the second under your control.
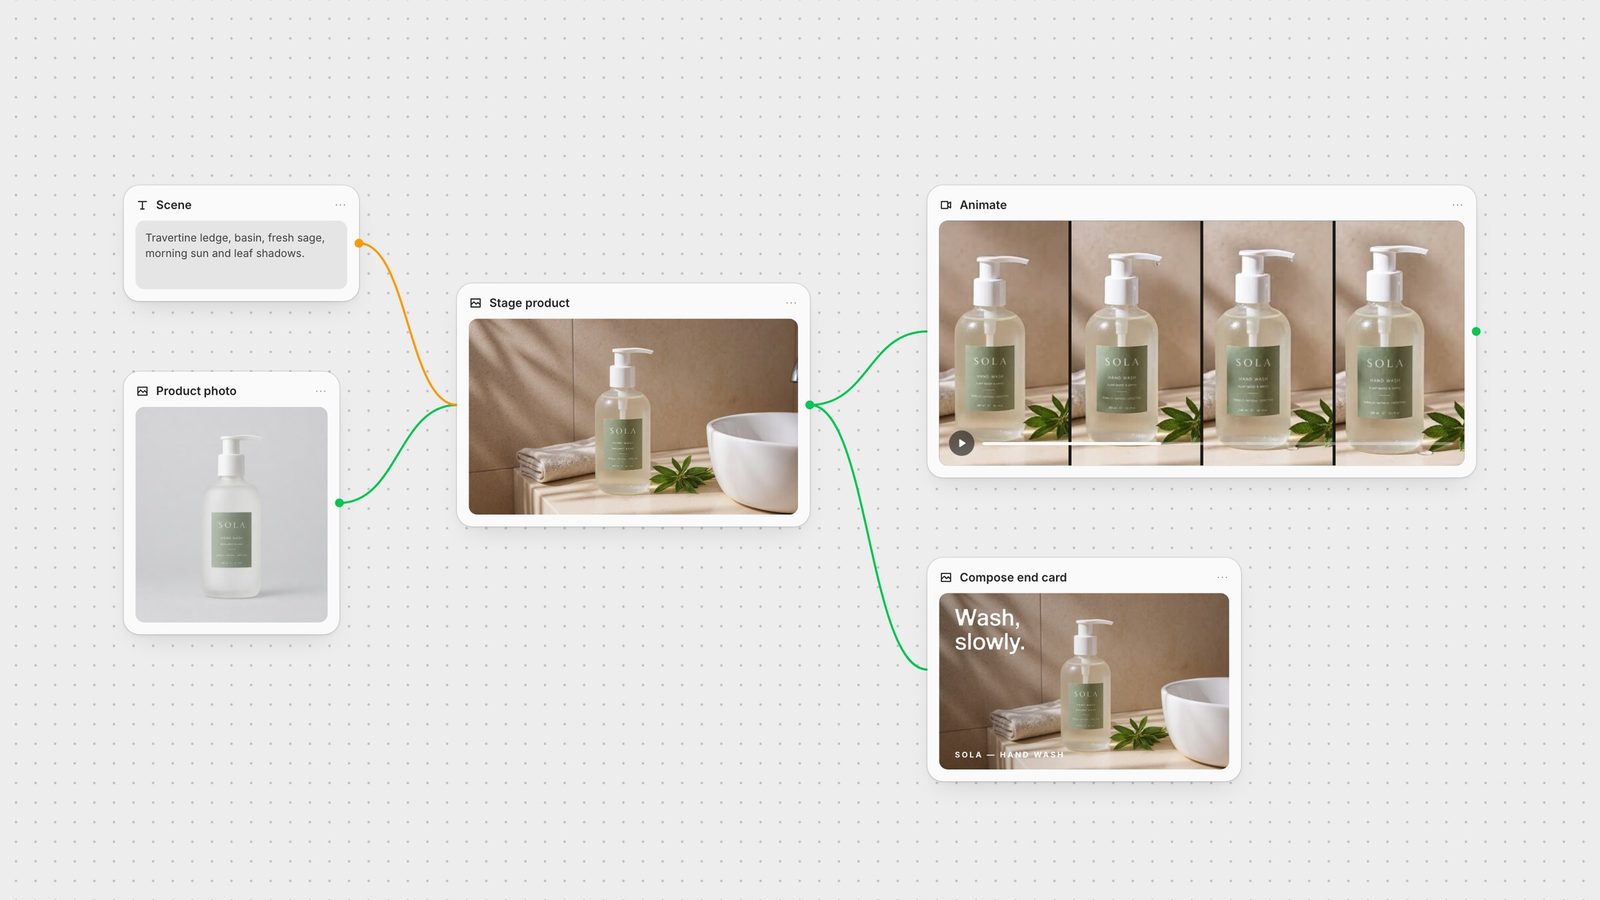
Use a sharp, evenly lit photo of the product on a plain background, shot straight-on. If you only have a busy photo, cut it out first with Background Remover. For our test we generated a fictional product, a frosted hand wash bottle called SOLA, with GPT Image.
Connect the packshot to an image model that takes references and describe the set, not the product: "Place this exact bottle, unchanged label and shape, on a pale travertine ledge beside a white basin, fresh sage, morning sunlight and leaf shadows."
FLUX.1 Kontext and Gemini Image restage from your reference and give you creative range.
Bria Product Shot places a product into a new scene described by a prompt or a reference image, with product integrity as its stated goal (docs).
Check the product closely before you animate. In our run the staged scene looked right at a glance, but the edit turned frosted glass clear and softened the small label text. That is normal for generative edits, and it is why Step 5 exists.
Image-to-video starts from a frame you already approved, so prompt the motion and ask for the product to stay still: "Slow push-in toward the bottle; sunlight shifts across the wall as leaf shadows sway; the bottle and label stay unchanged."
Seedance 2 uses one image as the first frame, or several as references. Our five-second Seedance 2.0 Fast clip at 720p held the bottle's shape through the push-in and returned its own ambient audio (docs).
Kling 3.0 is strong for cinematic camera moves and can generate audio with the shot.
Veo 3.1 accepts up to three Ingredients, reference images to combine, which helps when the product must appear with a model or a specific location (docs).
Generate in the aspect ratio you will publish: 9:16 for Reels, Stories, Shorts and TikTok, 1:1 or 4:5 for feeds. See social media image sizes for current specs.
Sound effects: if your clip is silent, connect it to Mirelo SFX or MMAudio, which generate sound synced to the video's motion. Mirelo can take a text prompt to steer it (docs).
Voiceover: write the line in a text node and send it to ElevenLabs TTS.
Captions: most social video is watched muted. Auto Caption burns subtitles into the video with configurable styling and placement (docs).
Generative models are not a substitute for your actual packaging. Open the Compositor, place the animated clip as a video layer, and add the original packshot, logo and legal text as their own layers wherever exact detail matters. Finish with an end card: headline, product and call to action. Export MP4 for the ad and PNG for the still variants (export docs). If the clip needs more resolution for large placements, run it through Topaz or SeedVR first.
Every step above is a node on one canvas, so the next product is a new packshot on the same graph. Save it as a Recipe and your team gets a product-ad workflow with the packshot and scene as its inputs. For more on campaign stills, see the best AI product photography tools.
Each step runs as its own node in Fuser, so you can change one without redoing the rest.
| Step | Models to try | What to watch |
|---|---|---|
| Image | ||
| Clean packshot | Background Remover, GPT Image | Straight-on, even light, plain background. |
| Stage the scene | FLUX.1 Kontext, Gemini Image, Bria Product Shot | Check label text and materials before animating. |
| Video and sound | ||
| Animate | Seedance 2, Kling 3.0, Veo 3.1 | Prompt the motion; ask for the product to stay still. |
| Sound and voice | Mirelo SFX, MMAudio, ElevenLabs TTS | Add effects to silent clips; write the voiceover as text. |
| Captions | Auto Caption | Burned-in subtitles for muted autoplay. |
| Finish | Compositor, Topaz or SeedVR upscale | Overlay real packaging and end card; export MP4. |
Yes. Stage the product in a scene with a reference-led image model, then animate that still with an image-to-video model such as Seedance 2, Kling 3.0 or Veo. Starting from an approved image keeps the product far more accurate than generating the video from text.
Expect small text and materials to drift in generated edits. Ask the model to keep the product unchanged, check each output, and place your original packshot or label as a separate layer in the Compositor for any shot where exact detail matters.
Use 9:16 for Reels, Stories, Shorts and TikTok, and 1:1 or 4:5 for feed placements. Generate in the ratio you will publish rather than cropping afterwards.
Some video models, such as Seedance 2, can return audio with the clip. For silent clips, connect the video to a video-to-audio model like Mirelo SFX or MMAudio, and use ElevenLabs TTS for a voiceover.
Yes. Save the graph as a Recipe with the packshot and scene description as inputs, and each new product runs through the same staging, animation, sound and finishing steps.
Stage, animate, score and finish your product video on one canvas.