One click, whole workflow
Recipes are here. Package a whole workflow and run it in one click
Explore recipesOne click, whole workflow
Recipes are here. Package a whole workflow and run it in one click
Explore recipesWhich Qwen editing model to use for text changes, object swaps, removals and new camera angles, how to write the instruction, and what our own before/after runs got right and wrong.
All guides · Qwen Image 2 in Fuser · Qwen Edit Angles in Fuser
Quick answer: for a free-form edit ("change this word", "replace the cup with a glass of juice"), use Qwen Image 2 with your photo connected: it switches to edit mode as soon as an image is attached. Write the instruction as old value → new value, then say what must stay the same. For a new viewpoint of the same shot, use Qwen Edit Angles, which has sliders instead of a prompt. For fixed jobs such as removing an object or putting a cut-out product into a scene, Qwen-Image Edit offers eight preset operations. All three run on the same Fuser canvas, so you can chain them.
Fuser ships four Qwen nodes that can edit an image. Their names are close, so be precise:
Qwen Image 2: Qwen's newest model, released 10 February 2026, described as "unifying image generation and editing in a single mode" (Qwen-Image on GitHub). With no image it generates; connect one to three images and it edits from a plain instruction. Standard is the default tier, Pro is optional. This is the node for text edits and object edits.
Qwen Edit Angles: re-renders the same subject from a different camera position. No prompt, only camera controls. It runs the multiple-angles LoRA on Qwen Image Edit Plus (fal model page).
Qwen-Image Edit: not a free-form editor. It is a menu of eight LoRA operations: Add Background (the default), Face to Full Portrait, Group Photo, Integrate Product, Next Scene, Remove Element, Remove Lighting and Shirt Design.
Qwen-Image: the original text-to-image node. Connect images and it switches to Qwen Image Edit Plus, which fal identifies as Qwen-Image-Edit-2509 (fal model page). Qwen trained that release for multi-image edits such as person + product or person + scene (model card).
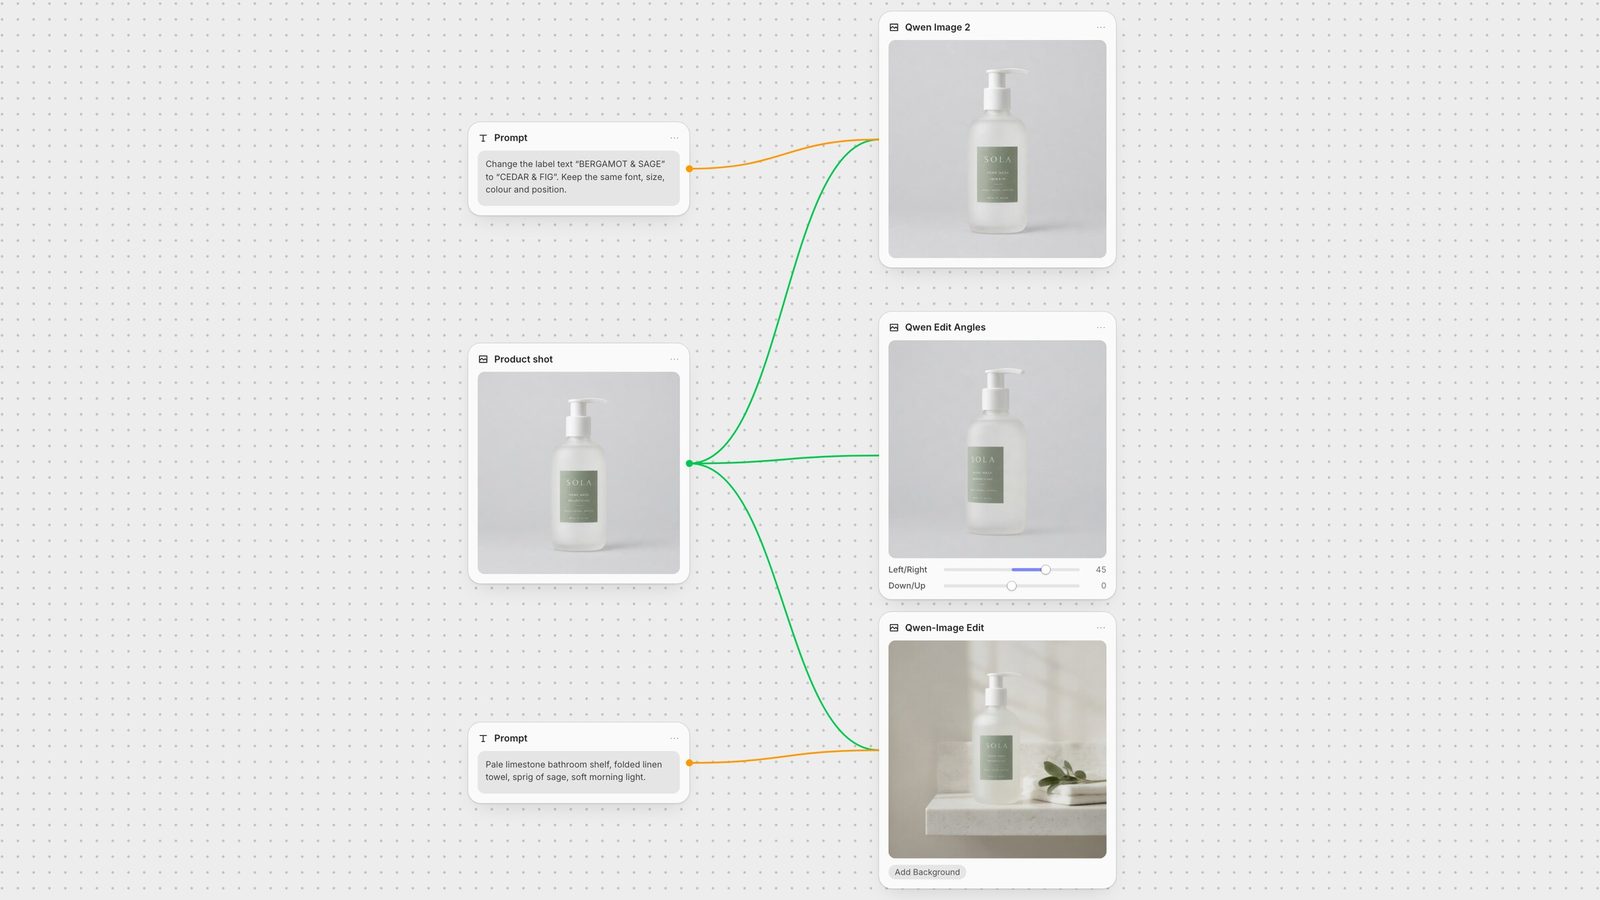
We connected a product shot to Qwen Image 2 and wrote:
"Change the label text "BERGAMOT & SAGE" to "CEDAR & FIG". Keep the same font, size, colour and position. Change nothing else."
The scent line changed and everything else on the label stayed in place: same typeface, same spacing, same bottle. At full size the small "Gentle · Natural · Effective" line came back a little softer than the original, so check fine print before you ship.
What made it work:
Quote the old text and the new text. Naming the exact string tells the model which line to change when a label has several.
Say what to keep. fal's page for this endpoint gives the same advice: be explicit about the change, state what to preserve, and avoid vague requests like "make it look better" (fal: Qwen Image 2 edit).
One change per pass. If you need three lines rewritten, run the node once per line and connect each output to the next Qwen Image 2 node. Qwen's own text-correction demos work step by step in the same way (Qwen-Image-Edit model card).
The second text test was harder: handwriting on a chalkboard at the edge of the frame. We asked for "Fresh at 7am" and said to keep the chalk style and the small heart. The new words were spelled correctly and sat on the board, but the handwriting came back neater than the original and the heart was gone. If a detail matters, repeat it in a second pass ("add a small chalk heart under the text") rather than hoping one instruction covers everything.
Swap. "Replace the coffee cup on the right with a tall glass of fresh orange juice. Keep the counter, the bread, the croissants, the lighting and the camera angle exactly the same." Qwen Image 2 replaced the cup and left the rest of the counter alone, including the window light. Listing the things to keep did the work; the model changes less when you name more.
Remove. For deleting something, the Remove Element operation on the Qwen-Image Edit node is a focused option. Our prompt, "Remove the chalkboard sign and its wooden crate on the right side of the counter", removed both and filled the gap with shelving and pastries that match the room. Remove Element still needs a prompt: every Qwen-Image Edit operation requires one except Remove Lighting.
Add to a product shot. If you start from a product on a plain background, the Add Background operation builds a scene around it. We described "a pale limestone bathroom shelf beside a folded linen towel and a sprig of sage, soft morning window light" and got a usable lifestyle shot (see the hero image above). The label's small text softened here too.
Output size: with Image Size on Auto, Qwen Image 2 kept our photo's aspect ratio but returned 1376 × 768 from a 1920 × 1072 source. If you need the original resolution, add an upscaler after the edit.
Qwen Edit Angles moves the virtual camera instead of following a prompt. The controls on the node:
Left/Right: −90 to 90 degrees around the subject. Negative rotates left, positive rotates right.
Down/Up: −1 to 1. Up moves the camera above the subject for a bird's-eye view; down gives a low angle.
Move Forward: 0 to 10, from no change to a close-up.
Wide Angle Lens: a toggle for wide-lens distortion.
Effect Strength: 0 to 2, default 1.25. Lower keeps more of the original image.
The node accepts up to two images, but its own description notes that behaviour is more predictable with one.
In our runs, a 45-degree turn on a round bottle read as a modest shift: the label slid across the curve and the pump rotated with it. The bird's-eye setting gave a convincing top-down view. In both, the large "SOLA" wordmark held up and the small print became unreadable. Do the angle change first and the text work last: turn the camera with Qwen Edit Angles, then feed that output to Qwen Image 2 to rewrite any text that needs to be sharp.
Add Background: puts a scene behind an object on a white background.
Face to Full Portrait: extends a cropped face into a full portrait.
Group Photo: combines the subjects of two to four images into one group photo.
Integrate Product: places a product into a background with matching perspective and light.
Next Scene: a follow-on shot of the same scene with a new camera move or framing. Start the prompt with "Next Scene:"; an Effect Strength of 0.7 to 0.8 is recommended.
Remove Element: deletes objects, people or text.
Remove Lighting: replaces harsh light with soft, even light. The only operation that works without a prompt.
Shirt Design: puts a graphic on a shirt; needs exactly two images, the person first and the design second.
Keep the source photo in one image node and branch it: one wire to Qwen Image 2 for copy changes, one to Qwen Edit Angles for alternate views, one to Qwen-Image Edit for backgrounds. Because every output is an image, you can chain them in any order, compare the branches side by side, and send the winner to an upscaler or to an image-to-video model. To compare Qwen with other editors on the same photo, see the best AI image editing models and our FLUX Kontext editing guide.
Pick by the job, not the model name.
| Edit | Node | How to ask |
|---|---|---|
| Qwen editing in Fuser | ||
| Change words on a label or sign | Qwen Image 2 | Quote old and new text, then list what to keep. |
| Swap or add an object | Qwen Image 2 | Name the object, its replacement, and what must not change. |
| Remove an object | Qwen-Image Edit · Remove Element | Name the object and where it is. |
| Put a product in a scene | Qwen-Image Edit · Add Background or Integrate Product | Describe the surface, props and light. |
| New camera angle | Qwen Edit Angles | No prompt: set Left/Right, Down/Up, Move Forward. |
| Combine several reference images | Qwen-Image (edit mode) or Qwen Image 2 | Say which image supplies which element. |
Qwen Image 2 takes a free-form instruction and edits whatever you describe once an image is connected. Qwen-Image Edit is a set of eight preset LoRA operations, such as Add Background and Remove Element, each tuned for one job.
In our test, Qwen Image 2 replaced one line on a product label and kept the typeface, size, colour and position. Quote the exact old text and new text, and tell it what to keep. Check small print afterwards, which can come back slightly softer.
Use the Qwen Edit Angles node. It has no prompt: set Left/Right from -90 to 90 degrees, Down/Up from -1 to 1 for low or bird's-eye views, and Move Forward from 0 to 10 for a close-up.
Large text such as a brand name held up in our runs; small print did not. Change the angle first, then pass the result to Qwen Image 2 to rewrite any text that must be sharp.
Up to three in Fuser. With none connected, the node generates from text instead.
Branch a single product shot into every Qwen edit and compare the results side by side.